Tuesday, March 31, 2009

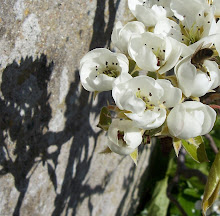
Pear Blossom

The pear tree is glorious. One of the few plants I didn't replace in our garden was the espalier conference pear. It is a prolific fruiter; which is not surprising really when you see how many flowers cover the tree and how many bees stop for a snack. The branches are practically humming with little stripy visitors.


Conference pears do not seem to be very common in Australia; at least I do not recall seeing them in the fruit shop. I am definitely a convert now though.

They taste divine freshly plucked from the tree after being gently warmed by the sun. They are best consumed whilst sitting in a deck chair surveying the children racing around on a sunny afternoon.

My Mum has confirmed that she is coming for a visit in October so they should be just about ready to eat by then. Mum visited Bumble Bee Cottage in October of the 2007, when we had only been in Guernsey for four months. The pears covered the tree when she arrived but not one could be seen by the time her visit had ended. She managed to convert all the children to pear munchers so I will be lucky to get one with four sets of gnashing teeth ready to go. I wonder if Mum planned her visit to coincide with pear season?

Monday, March 30, 2009

Chocolate Brownies with Jelly on the side

My cousin, Mandy, has asked me for my chocolate brownie recipe so I thought you might like a copy as well. Yes, yes I know this is clearly not a picture of a brownie but I am in the middle of painting furniture so cooking will have to wait. However I do have this lovely picture of layered jelly for your consideration; see how it sparkles in the kitchen light. Let me hear you say 'ooooh'; a little louder please I can't hear you.


Well anyway here is the brownie recipe, I hope it doesn't add too many centimetres to your waistline.

Chocolate Brownies

300g butter
2 ¼ cups caster sugar
5 eggs
1 ¼ cups plain flour
1 ¼ cups cocoa
2 packets of chocolate chips or 200g raisins or pecans

Preheat the oven to 180*C and prepare your baking tray (it is best to grease and line it). Cream together the butter and sugar. Once the mix has lightened in colour add the eggs one at a time, beating in between each egg. Please break your eggs into a separate cup in case you get a bad one, as if you break it straight into the mix you will have to throw it out and start again. I never thought this was that important until I got a bad egg. Yuck, yuck and double yuck. Sift in the flour and cocoa. Mix the mixture on high for a minute or so. Add you chosen optional ingredients and mix. Press the mixture into your prepared biscuit tin and cook at 180*C for 40 minutes. Cook the brownies for longer for a crispy top and for less time for a more chewy texture. Cut once the brownies are cool. These keep well in the fridge.

If you like fluffy more cake like brownies use a mixer for this recipe but if you like you brownies more fudgy use your hand to mix everything. You could try a spoon but I find a clean hand gives the fudgiest brownies as it does not put any air into the mix.


Why do I know that mixing this recipe with your hand will give a fudgier brownie? Well when I was first given this recipe I did not own a mixer of any description, so I tried a spoon, but it never creamed the butter and sugar well enough. I'm always impatient to get started on the recipe so I think my butter is probably always too hard, so using my hand gave the best result. Don't worry about the hygiene factor, as long as you wash your hands and clean under you nails, your hand will be just as clean any piece of kitchen equipment you would choose to use instead.


Now I have posted photos of jelly I suppose I should give a few jelly tips. I made this jelly for my daughter's birthday in a large plastic salad bowl. I find plastic bowls are better for jelly (if you intend to turn it out onto a plate that is, as opposed to scooping it straight from the bowl) as the bowl has a little 'give' in it so it is easier to use a spatula to get air between the jelly and the bowl. Once you get some air in there the jelly should come away from the bowl fairly easily.

I mastered making this type of layered jelly last year as I made eighteen, yes eighteen, let me say it one more time, eighteen, packets of jelly for our school's family BBQ. If you intend to turn out your jelly as shown in the top picture you will need to add more gelatine as your standard off-the-shelf jelly will spread too much and not hold much shape; unless you are looking to do a remake of the movie 'The Blob' I strongly suggest more gelatine. I used one extra sachet of gelatine to make the above jelly. There are three packets of jelly in this mould so I you could say a three packets of jelly to one sachet of gelatine ratio should do it. If you want a firmer jelly add more gelatine; as you can see from the photo, even with the extra sachet my jelly still spread. It really is trial and error to see how you like it yourself.

Make each colour one at a time and allow it to set fully before adding the next colour on top. Allow the new colour you are going to add to cool or you will 'melt' the colour layer underneath. Pour the new colour over the back of a spoon to avoid making big gouges in the layer of jelly beneath. This process will take a few hours so do it well in advance of when you are going to need it.

Please read the instructions on your gelatine. You need to dissolve gelatine in cold water. Into a heat proof bowl of COLD water sprinkle the gleatine and whisk with a fork at the same time (now could you please rub your tummy and pat your head just for good measure). Let the gelatine stand for a few minutes, then, place your bowl in another bowl of hot water (this is why it is important your bowl is heat proof) and stir it until the gelatine dissolves. NEVER BOIL GELATINE. Make sure the gelatine mixture and the mixture you want to add it to are about the same temperature or you risk getting lumps, and no mother wants to be known as the maker of jelly with 'booger' lumps - as I am sure my son's friends would call it!

Thursday, March 26, 2009

Sugar, sugar, sugar

The PTA ladies are coming over to my house tonight to bag sweets for our school's Easter Disco.

There will be NO sampling.

There will be NO quality control tasting.

There will be NO sweet wrapper sniffing.

All hands will be well scrubbed.

Once we are finished there will be alcohol and dips.

Tomorrow night there will be 'E' number frantic grooving at the disco.

I've got pink, gingham, feathered, bunny ears to wear.

Only the strong survive working on the tuckshop.

My kids just want to know how much money they can have to spend. Enough to have a good time but not enough to go CRAZY. How much this is we can only guess! Wish me good luck.

Wednesday, March 25, 2009

Fairytale Dreaming

Swimming lessons will have to wait today. Our household is under siege by yet another Guernsey Germ. Someone has been unwell in our house at least every two to three weeks since we moved here. I have a theory that as we have not been exposed to the ‘bugs’ on this Island, but rather Australian ‘bugs’, we catch everything that is going around.

So it is a two post day. The dishes are done, the washing is put away and the children are fed. Now all I need do is wait for the arrival of my significant other; so to my computer I go.

I was given my first ‘Dean’s’ book, ‘Dean’s Gift Book of Nursery Rhymes’, for my seventh birthday by my friend Jodie. It was one of those magical books you own as a child, the type you wish you could step through the pages and enter the illustrated world beyond.

All the little girls are beautifully dressed,


the boys suitably scallywag,


the fairies sparkly and the animals adorable.


Years later at the Lifeline Book Sale in Brisbane I found another of the ‘Dean’s’ books; its spine was torn and cover very dented and dirty but I loved it anyway.

It was not until more years had passed that I came across one more of these books, by chance, on Ebay. It was then I realised it wasn’t actually specifically the Dean’s books I loved it was in fact the illustrators, Janet and Anne Grahame Johnstone.


Such a talent these two sisters had. They were twins born in 1928. They didn’t become popular illustrators until the 1950s. Janet’s work focused on birds and animals while Anne’s specialty was period costumes. They would always work on a piece together passing the work backward and forward until both of them were satisfied with the outcome.

They have illustrated more than 100 books during their joint career, including the original ‘101 Dalmatians’ by Dodie Smith, numerous fairytale books, ‘The Manxmouse’ by Paul Gallico and most famously ‘The Enchanted Wood’ by Enid Blyton.


Janet sadly died in 1979. Anne continued to work as an illustrator until 1998, when she passed away from cancer.


My collection of their works has now grown to thirteen books, most Dean's; all are battered and bruised but when I open the pages and read them to my own children I see in their eyes the sense of wonderment they evoked in me all those years ago.


So here is my little tribute to two inspiring women who captured my imaginative heart as a child and still hold it today.

Warm and Woolly

I love woollen blankets. I think it stems from my childhood when I would visit my Nan and we would get to stay up late watching ‘Magnum PI’ under her dark blue and forest green tartan woollen blanket eating fantails (a type of Australian sweet). She would store it in a camphor wood chest by her front door so it always smelt of camphor laurel. I wish I had asked if I could have had that blanket when she passed away, but I think I was too young to appreciate its value.

My other ‘warm’ memory of wool is when my Mum would come in and tuck me in at night in winter. We had bright orange, satin trimmed woollen blankets (well it was the 70s). Mum would tuck me in very tightly and you could snuggle down under the blanket and flannelette sheets, safe and warm. We lived in a 1930s wooden house in Queensland and they are built to keep you cool in summer not warm in winter. Although Queensland is in the sub-tropics it could still get below 0*C some nights.
At least I now live in a country that warrants such a collection. In Australia we were only able to use them for around three months of the year. I have now taken the blankets off all the beds; they have been freshly washed in wool mix and sun dried ready for storage until next autumn. I miss the lovely eucalyptus wool mix I used to use in Australia; it smells like home.

I bought some blankets in Australian car boot sales, some on Ebay, some in charity shops and one in the Blarney Woollen Mills in Ireland. I paid £19.95 for the blue and green Blarney tartan one some 13 years ago; that was a large amount of money in Australian dollars to a backpacker in those days. It was carted around Ireland, the Isle of Man, Scotland, England, France, Italy, Greece and Hong Kong before it reached its final destination back in Aus. I can not claim the carting credit however, as though I did carry it for some of the way, my boyfriend ended up carrying it once he met up with me. He can’t really complain as he reaps the benefits now, snuggling up under it with me in winter.

Tuesday, March 24, 2009

Bodnant Garden

The other night I was watching the 'Antiques Roadshow' and it was filmed in Bodnant Garden in Wales. We were lucky enough to go to this truly spectacular garden when we went to visit my Aunty Susan in Manchester last May. This prompted me to have a look at the photos once more and got me to dreaming about our own cottage garden and all the possibilities. Please come for a stroll with me through this beautiful floral fairyland.


We were driving back to Manchester from Anglsey Island and I had asked Sue what all the lovely yellow creepers where in alot of gardens we past. She told me that it was laburnum and that there was a laburnum walk in a garden which was not too far out of the way. I'm so pleased I asked, visiting this garden was truly one of the most wonderful afternoons I have ever had.


It was just spectacular. There is no other word.


I love this photo, probably just because I took it on my little camera and the bumble bee is in focus! You can almost hear the buzz as it hovers.


This is another of my favourite photos. Arty by accident.

I hope these photos may prompt a visit to this fabulous garden this May. I hope I can capture just a hint of its quality in our own little garden. Thankyou Aunty Sue for such a lovely holiday.

Monday, March 23, 2009

Aunty Nancy’s Zucchini Slice

What are we having for dinner tonight? Let’s take a look.

Aunty Nancy’s Zucchini Slice

3-4 medium to large zucchini (I still don’t call them courgettes)
1 medium onion
4 rashers of bacon
1 cup (approximately 200g) grated cheese – I use mature as this is what I prefer
1 cup self-raising flour, sifted (This is very important or you will get lumps of flour in the mix)
½ cup oil (this amount is in the original recipe from my Aunty but I usually just use a ¼ cup as a ½ cup seems a little excessive)
5 eggs, lightly beaten

Grease a 16x26cm tin or oven proof glass dish. Pre-heat the oven to 180*C. Grate the unpeeled zucchini, coarsely. Finely chop the onion and bacon and fry them until lightly brown. Combine all the ingredients and season to taste. Pour into your prepared dish/tin and bake for 30-40 minutes until brown.

Don’t forget the twice broken egg rule I have mentioned in previous recipes. ALWAYS break your eggs in a separate cup before adding it to whatever you are cooking; do this one egg at a time, pouring them into the other dish, in this case for whisking. BEWARE OF THE ROTTEN EGG! Once you have had one you will NEVER forget the smell!

This is a very quick dish to make, it maybe takes 15 minutes in the preparation. It is nice served with a simple salad with your favourite dressing.

I can hear you asking ‘Why does my bacon look sort of frosty and rolled?’ Well I cheat and cook my bacon from frozen when I am running low on time. If you do this you will need to cook it for a little longer as it releases more liquid and you will need to fry this off or it won’t start to brown. Hey I’m a Mum not a superstar chef!!

I roll my bacon before freezing it and stack it vertically in a container. Just make sure your container is taller than the width of the bacon or the lid won’t close and if you do manage to jam it shut your bacon will be all smooshed and will be harder to prise apart (I hope I’m explaining this properly. I'm understanding when I reread it, I just hope you can!). The rolled bacon is much easier to take apart piece by piece than trying to reef a piece of bacon off the top of another one; half of it breaks off, you bend your knife, you take out an eye, slice off half your nose, you get the idea:P


I have just realised there are rather a lot of exclamation points in this recipe. Here are a few more for good measure!!!!!!!!!!!!!!!!!!!!!!!!

PS. This will turn out far better if cooked to ‘The best of Hot Chocolate’, sung very loudly and dancing around the kitchen in a fashion which warrants much eye rolling from your children.!!!!

Saturday, March 21, 2009

Progress in the Kitchen

I have finished painting the kitchen walls. I actually finished them a few weeks ago but didn't get around to posting about it as I had a grand plan that the cupboards and the brickwork would also be finished and I could show them all at once. The weather has been so lovely that all indoor decorating has ceased in favour of the outdoor kind; so the cupboards and bricks are just going to have to wait. I learnt along time ago of the folly of failing to test paint on walls BEFORE you paint the entire room, so I tested nine different colours (8 blue and 1 green). The coffee colour was going to be for the cupboards but we since decided to paint them all white.


Our kitchen was yellow. I have nothing against yellow kitchens. The kitchen in one of our previous homes was yellow and it makes for a bright and happy room but my taste has changed due to excess exposure to too many 'Country Living' and 'Country Homes' magazines, so blue it is.

I took me three days to paint the walls as there are an awful lot of corners in our kitchen and I couldn't reach above the cupboards so my husband painted them for me. It is actually quite ridiculous that it took so long to paint as there isn't that much wall space in the kitchen but the cutting-in took forever.

In the end we settled on Dulux 'First Dawn' and we are both very pleased with the results. It has freshened up the room so much.

We are going to get professionals to paint the kitchen cupboards. Our kitchen is solid wood and still in quite good condition. It does need a little TLC here and there so we are going to spruce it up rather than replacing it. So not only do we save thousands of pounds but also avoid the stress of all those workmen in the house for weeks on end. A friends parents have just done something similar to their kitchen and the painters took the cupboard doors and drawers away to paint them and only had to be there to paint the trim. If their quote is reasonable we will go ahead with that. I hate using enamel paint. I can never seem to get a nice finish with it and as this is the room we use the most I would have to look at my botched painting effort quite alot so I think paying professionals is a good option.

There are two large wood clad beams on our kitchen ceiling. We are going to paint both them and the exposed brickwork white as the red stained beams and the red bricks are a little overpowering. Then the last thing we need to do it get rid of the mural tiles on the splash backs and it will be like a new kitchen.